|
BUILD A 5 WATT 40 METER TRANSMITTER |
BY N1HFX |
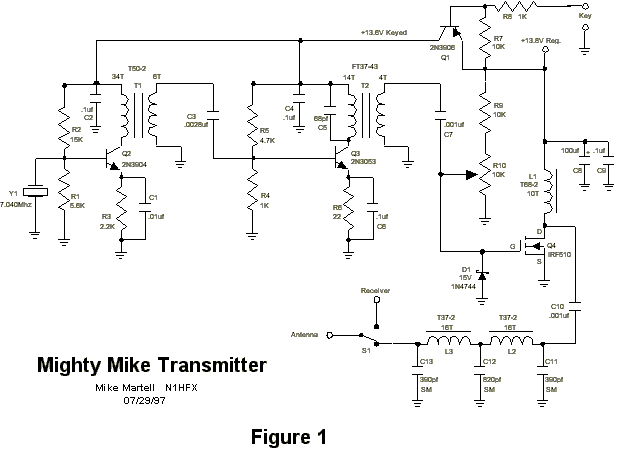
As ham operators, we like to broaden our horizons by trying something new. There is nothing more satisfying about this hobby than building your own transmitter. The circuit in figure 1 is a crystal controlled CW transmitter with at least 5 watts of power. (The prototype generated 7 ½ watts) This circuit was built on a Radio Shack universal board (276-168B) and worked extremely well the first time on the air.
This circuit is unique in that it uses a power mosfet as a final rather than a conventional bipolar transistor. The advantages are as follows:
| a.) | Very high gain with almost 90% efficiency. (Only a small heat sink is required.) | ||
| b.) | Power mosfets do not exhibit thermal runaway as with bipolar devices. | ||
| c.) | Resistant to high SWR. 30 second key down with no antenna resulted in no damage. |
The disadvantages are that a bias voltage is required because the gate threshold voltage can be anywhere between 2 and 4 volts for any power mosfet. This bias must be adjusted for the particular transistor installed in the circuit. In addition, a Zener diode is required to insure that the gate voltage never exceeds 20 volts. This circuit proves that the advantages far outweigh these requirements.
The adjustment of the bias voltage is critical and is adjusted by first turning R10 so that zero volts appears on the gate of Q4. Install an ammeter to the 13.8 volt supply voltage and apply power. At this point the circuit should only be drawing just under 1 milli-amp. Now turn R10 slowly until the ammeter reads about 5 milli-amps. This adjustment should never exceed 10 milli-amps. Turning R10 up too high can cause damage to the power mosfet. Once adjusted, R10's setting remains the same unless Q4 is replaced.
All transistors can be purchased at Radio Shack and should not be substituted. Crystal Y1 is a 7.040 MHz crystal and can be purchased from Dan's Small Parts & Kits or from Doug Hendricks. Send $3 to Doug Hendricks, 862 Frank Ave., Dos Palos, CA 93620. (Specify 7.040MHz or 7.122MHz.) A small heat sink is required for Q3 and Q4. S1 switches between transmit and receive modes so that no damaging RF gets to the receiver being used. The frequency is fixed but a trimmer capacitor can be installed in parallel or series with Y1 to allow some adjustment of frequency. Toroids can be purchased from Dan's Small Parts & Kits or from Palomar Engineers.
DE N1HFX
Parts List
| R1 | 5.6K Resistor (Green, Blue, Red) ¼ watt | |
| R2 | 15K Resistor (Brown, Green, Orange) ¼ watt | |
| R3 | 2.2K Resistor (Red, Red, Red) ¼ watt | |
| R4,R8 | 1K Resistor (Brown, Black, Red) ¼ watt | |
| R5 | 4.7K Resistor (Yellow, Violet, Red) ¼ watt | |
| R6 | 22 ohm Resistor (Red, Red, Black) ¼ watt | |
| R7,R9 | 10K Resistor (Brown, Black, Orange) ¼ watt | |
| R10 | 10K Trimmer pot, ¼ watt or larger | |
| C1 | .01uf Ceramic disk capacitor | |
| C2,C4,C6,C9 | .1uf Ceramic disk capacitor | |
| C3 | .0028uf Ceramic disk capacitor (Use two .001uf capacitors and one 820pf capacitor in parallel.) | |
| C5 | 68pf Ceramic disk capacitor | |
| C7,C10 | .001uf Ceramic disk capacitor | |
| C8 | 100uf electrolytic capacitor. (observe polarity) | |
| C11,C13 | 390pf Silver Mica capacitor | |
| C12 | 820pf Silver Mica capacitor | |
| D1 | 15 volt Zener diode. 1N4744 or similar. | |
| Y1 | 7.040 MHz or 7.122 Mhz crystal | |
| T1 | T50-2 toroid. 34 turns #26 wire for primary. 6 turns #22 wire for secondary. | |
| T2 | FT37-43 toroid. 14 turns #26 wire for primary. 4 turns #22 wire for secondary. | |
| L1 | T68-2 toroid. 10 turns #22 wire. | |
| L2,L3 | T37-2 toroid. 16 turns #26 wire. | |
| Q1 | 2N3906 transistor | |
| Q2 | 2N3904 transistor | |
| Q3 | 2N3053 transistor. Must use TO-39 or similar type heat sink. | |
| Q4 | IRF510 Power Mosfet transistor. Must use TO-220 heat sink(276-1363). | |
| S1 | Any suitable SPDT switch |

Toroid Sources:
| Dan's Small Parts & Kits |
| Box 3634 |
| Missoula, Montana 59806-3634 |
| Palomar Engineers |
| P. O. Box 462222 |
| Escondido, CA 92046 |