Home Brew a Condenser Microphone
Electret condenser microphones have truly come
of age in recent years. No longer are they as temperature
sensitive as in the past and they have found their way into many
modern amateur transceivers. An inexpensive condenser microphone
with excellent performance can be easily constructed with easily
available parts.

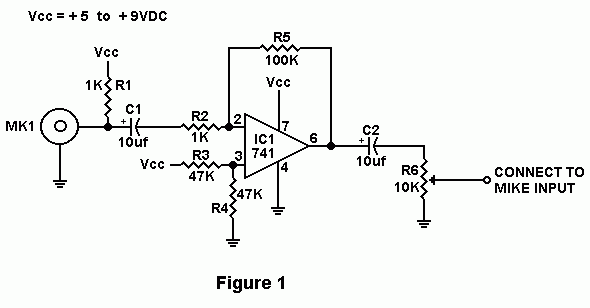
The circuit in Figure 1 consists of an electret condenser microphone with a 741 op amp chip giving enough gain to drive any transceiver's microphone input. In the circuit, resistor R1 gives a small amount of current which is required to operate the condenser element. Capacitor C1 blocks the DC currents and couples the audio to the amplifier circuit. Input resistor R2 and feedback resistor R5 set the gain of the amp to 100 which is calculated by dividing R5 by R2. Resistors R3 and R4 provide a voltage divider network to allow the 741 op amp to operate from a single voltage source in lieu of a dual polarity voltage supply. Capacitor C2 couples the audio output and blocks the DC voltages in the op amp circuit. Resistor R6 controls the output level from the op amp circuit.
If you find that the circuit has too much gain for your transceiver, eliminate all components except MK1, R1 and C1. Connect the microphone input of your transceiver to the output of C1. Since the condenser element has a built in amplifier circuit yielding a small amount of gain, the 741 op amp may not be needed for some transceivers. This circuit will operate anywhere from 5 to 9 volts. If you must operate it at 12 or 14 volts, increase R1 to 2.2K.
A more sophisticated version of this circuit
has found its way into many ham magazines and has been packaged
in a wide variety of packages including flexible goose stands as
well as PVC. Pick any package which suits your needs. Take a good
look at those old CB mikes that don't work in your junk box,
since this circuit will easily fit inside that old mike. Many
modern amateur transceivers have a 5 or 8 volt power source at
their mike connector which could easily be used as the power
source. If you prefer, rejuvenate an old desk mike by replacing
the innards with the circuit in figure 1.
The circuit in figure 1 was designed primarily
for simplicity but it will yield outstanding performance for a
minimum of parts and effort. The circuit provides excellent
sensitivity with a wide frequency range.
PARTS LIST:
| R1,R2 | 1K Resistor |
| R3,R4 | 47K Resistor |
| R5 | 100K Resistor |
| R6 | 10K variable resistor. Use PC mount type (271-282) or potentiometer (271-1715) as desired. |
| C1,C2 | 4.7 or 10 microfarad electrolytic capacitor. (272-1024 or 272-1025) |
| IC1 | 741 op amp IC.(276-007) |
| MK1 | Electret Condenser Mike element. (270-090) |
DE N1HFX