Build A Simple Rechargeable CMOS Battery |
| By N1HFX |
Occasionally we come across a computer motherboard that seems to eat those CR2032 batteries every 4 to 5 months. This is particularly frustrating because the computer works perfectly once booted but all the important BIOS settings are lost when the CR2032 battery fails. This is very irritating if the affected computer will not boot up with the default BIOS settings. I recently had a computer motherboard with this same irritating phenomenon. A test revealed that the current drain on my CMOS battery was about 30 microamps. While this does not seem excessive, it is large enough to drain a CR2032 battery in a few months. While the simplest solution may be to replace the motherboard, it seems wasteful to trash a perfectly functioning motherboard just for this reason. I had seen rechargeable battery systems in catalogs with prices as high as $50 dollars. In the Amateur tradition, I searched for a better and less costly solution.
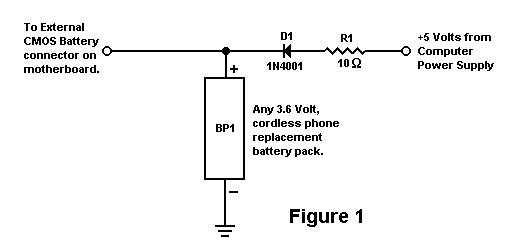
The circuit in Figure 1 is an inexpensive rechargeable CMOS battery system that can be built from readily available parts. The heart of the circuit is the 3.6 volt rechargeable cordless phone battery pack. With the popularity of cordless phones, these replacement battery packs can be found in many department stores for as little as $6. The particular brand used is not important only that it is a 3.6 volt (3 nicad cell) type. To get the necessary 5 volts from the computer power supply, a Y power connector is needed. One of the power leads has 12 volts and the other has 5 volts. Since wire color coding schemes vary, use a voltmeter to connect to the right lead. The remaining two black leads go to ground. A connector will also be needed to connect the battery system to the external battery connector on the motherboard. It may be necessary to add or remove a jumper on the motherboard to use an external CMOS battery. Check the computer motherboard documentation for information on using an external CMOS battery. Resistor R1 is a 10 ohm ¼ watt resistor and D1 is a 1N4001 diode.
The resistor limits charging current to about 40 to 50 milliamps and diode D1 prevents the battery from discharging through the computer power supply when it is turned off. When the circuit is first installed it will be necessary to run the computer for several hours to get the battery pack charged up. After this initial charge, the computer can be run for as little as 2 hours a week.
I have used this circuit for several months and I have found it to be an excellent external CMOS battery that never needs replacing.
DE N1HFX
